JavaScript
In this chapter we'll look at the features available in JavaScript for working with audio, namely the Web Audio API. Technically, the Web Audio API is not part of the JavaScript language itself, but is a standard part of the web platform implemented by modern browsers.
We won't cover JavaScript itself here as it's already well documented elsewhere. If it's your first time using the language or you need a refresher, refer to the Further Reading section at the end of this chapter for some recommendations.
We'll start by defining what the Web Audio API is and where it came from, then move on to cover two of it's key concepts: graphs and timing. Along the way we'll get a feel for the API and what it can do.
Background
The Web Audio API is a set of APIs for generating and processing audio in the browser. It's designed by the W3C Audio Working Group and chartered to "add advanced sound and music synthesis capabilities to the Open Web Platform."
It has been in development since 2011, with the spec recently reaching v1.0 (with v2.0 in the works) and becoming a W3C Candidate Recomendation. Despite its candiditate status, it's already well supported in browsers, reaching 96% of users at time of writing.
Common use-cases cited for the Web Audio API are to bring music composition and audio editing tools (e.g. Ableton Live, Logic Pro) to the browser, as well as enabling real-time audio for games and VR. Beyond these obvious applications, bringing sound to the mix opens up another dimension for building a more sensory web.
The Web Audio API
The Web Audio API itself is relatively small, and is covered comprehensively by the MDN Web Docs, the go-to source for understanding everything the API can do.
Rather than repeat the documentation here, we'll instead focus on the two aspects of working with the API that are most different from traditional web development, namely the audio graph and the timing model. We'll cover just enough of the API to get up and running creating our own bleeps and bloops.
Graphs & Nodes
RETHINK
Trees are not their own thing, they are a type of graph.
As web developers, we're used to working with the DOM, a tree data structure representing a hierarchy of nodes that we traverse via parent, sibling and child relationships. The Web Audio API, on the other hand (and audio apps in general), organizes nodes in a graph data structure.
IMG
Tree vs. graph
Source nodes generate signals and are the inputs of our system. These signals are routed through effect nodes to modify them in various ways. Everything ends up at a single destination node, i.e. our speakers, producing the audible output of our system. This is digital signal processing 101.
IMG
Graph
It's worth taking a moment to understand the fundamental differences between tree and graph data structures. Graph theory is it's own rich topic, but a key point to note is that a graph is not a heirarchy, but is instead like a flow chart or electrical circuit. Each node is "equal" and can be connected to any (and many) other nodes, and connections can be circular (in fact this is essential to produce certain types of effects). Specifically, the Web Audio API uses a directed graph, that is, signals flow in a single direction, from source to destination.
If we think about it, this is not such a new concept. We build pages (nodes) which we link together to form websites and apps (graphs), which together form the internet, itself a graph of servers, routers, etc.
IMG
Internet network
A big part of working with the Web Audio API involves creating nodes and making sure they are wired up correctly in our graph. So let's see how this works...
Creating Our Graph
Our graph exists in an AudioContext. Everything we do via the Web Audio API
happens in this context, similar to how a <canvas> element creates its own
environment for drawing. We'll generally only create a single AudioContext per
app and use its factory methods to create the nodes of our graph:
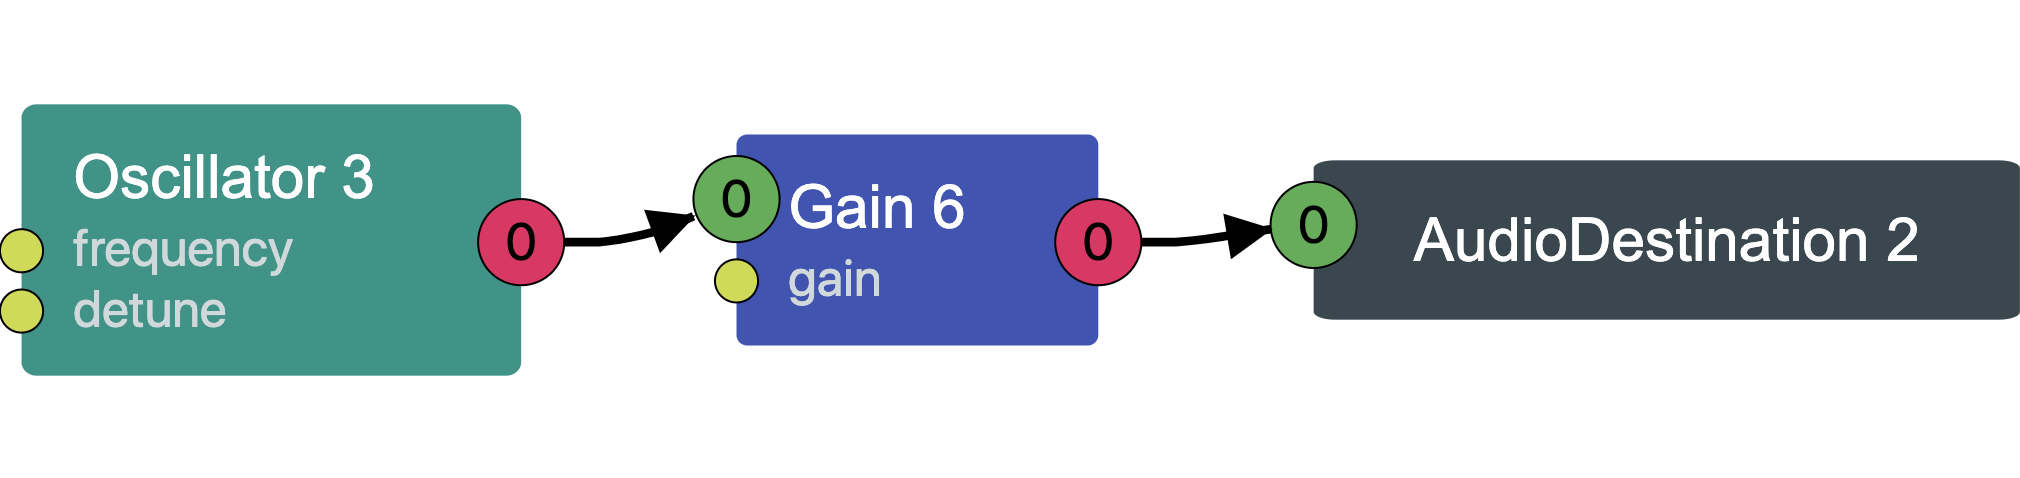
Here we create an AudioContext, and from it create two different node types.
an OscillatorNode, a type of source node, and a GainNode, a type of
effect node (we'll cover what these nodes actually do shortly). We connect the
OscillatorNode to the GainNode, and the GainNode to the destination node
of the AudioContext i.e. our speakers. Our graph looks as follows (rendered in
Chrome with the Web Audio Inspector).
Nodes
Everything we create in our graph is a node. All nodes implement the
AudioNode
interface, extended with additional properties and methods specific to their
type.
A node's properties can be get and set as you'd expect, but with an additional
super-power: they implement the
AudioParam
interface, meaning changes to them can be scheduled over time (currentTime is
covered in more detail in the next section):
All nodes implement the connect() method, which is how you connect the output
of one node to the input of others. This chaining is what creates our graph.
IMG
Connected nodes showing signal flow
Nodes themselves can be grouped into two types: source nodes and effect nodes.
Source Nodes
IMG
Source > Effect > Destination
Source nodes are anything that produce an audio signal and are the inputs of our system. There are several types of source node, but we'll cover just the two most common here:
OscillatorNode– for synthesizing our own sounds.AudioBufferSourceNode– for playing back recorded sounds (samples).
All source nodes have a start() and stop() method, which as you might guess,
start and stop them producing their audio signal.
Source nodes are single use only
An important aspect of source nodes is that they are single use only, or "fire
and forget". Once a node has stopped (either by manually calling stop(), or by
reaching the end of the sample it was playing), it cannot be restarted.
In creating a piano instrument, our instinct might be to create 88 nodes, one for each key. Instead, we actually need to create a new node each time a key is pressed. In this way, our audio graph is not something fixed that we define ahead of time, but is instead a dynamic structure that changes as new nodes are created and discarded. Source nodes are intentionally cheap to create and stopped nodes are automatically garbage-collected for us.
OscillatorNode
To synthesize our own sounds we can use an OscillatorNode. This produces a
waveform (sine, square, triangle, etc.) oscillating at a given frequency
(specified in hertz). By combining different types of oscillators and effects,
we can produce an infinite range of sounds.
AudioBufferSourceNode
To play back recorded sounds (samples) we can use an AudioBufferSourceNode.
This node is responsible for playing back and controlling the sample, but the
sample itself is stored in an AudioBuffer. In this way we can load a sample
once, and use it many times.
Loading a sample is a two step process. We first need to fetch it over the
network, then decode it into a format that AudioBuffer understands.
The whole process of loading, decoding, and finally playing back a sample looks as follows:
Effect Nodes
IMG
Source > Effect > Destination
We can route an audio signal (coming from a source node) through a wide range of effect nodes. These modify the incoming signal in some way, producing a new signal as output. The Web Audio API defines some basic primitives, which can be combined to create all sorts of effects. The most common ones are:
GainNode– adjusts the volume of a signal. By applying this over time we can also model ADSR envelopes (e.g. if a sound should start abruptly or fade in slowly).BiquadFilterNode– cut or boost certain frequencies of a signalConvolverNode– apply reverb to a signal so it sounds like it's in a certain physical space (e.g. a small room or large hall).DelayNode- apply a delay to the outgoing signal, used for all sorts of effects from echoes to phasing.DynamicsCompressorNode– applies compression to a signal to control its dynamic range (e.g. to avoid distortion)WaveShaperNode– applies distortion to the signal.PannerNode– places the audio in the stereo field (i.e. to the left or right in stereo output).
Destination Node
IMG
Source > Effect > Destination
The
AudioDestinationNode
is the final node in the chain and represents our audio output device (i.e. our
sound card). This is provided for us as the destination node of our
AudioContext. In addition, there's also an
OfflineAudioContext
with its own destination if we want to render our audio to disk, for example.
Timing Model
Timing, as we'll see, is probably the trickiest aspect of working with audio. Understanding how the Web Audio API handles timing, and how this differs from traditional JavaScript timing, will be essential for writing our own scheduling functions later in the book.
JavaScript Timing
In regular JavaScript, we can think of the browser as running our code in a
single process. When we schedule something to happen in two seconds (using
setTimeout or setInterval), the browser doesn't guarantee that it will
happen in exactly two seconds, rather that it will run in about two seconds,
depending on the priority of other tasks in the queue.
IMG
setInterval example and JS fuzzy timing diagram
Web Audio API Timing
JavaScript's loose timing model is fine (and usually desirable) for most applications, where millisecond delays in e.g. updating the UI would be imperceptable. But for music, any imprecision is immediately obvious and tends to get worse over time as things drift out of sync.
For this reason, the Web Audio API has it's own internal clock. Under the hood, our calls to the Web Audio API are sent to a seperate "rendering" thread that performs the audio computation and returns the results to the main "control" thread (i.e. our code). It's in this rendering thread that the Web Audio API clock runs, and is the reason it can maintain highly accurate time, regardless of the work being performed in the main thread.
We can access the Web Audio API clock via the currentTime attribute of the
AudioContext:
currentTime starts counting from the moment the AudioContext is created.
Note that unlike in regular JavaScript, time is represented in seconds as a
floating point number.
We can't change currentTime, we can only schedule things relative to it:
IMG
Timeline from init + relative timing
Beyond getting and scheduling relative to currentTime, the Web Audio API gives
us very little else to work with. Later in the book we'll create our own timing
abstractions to handle beats, bars, and time signatures.
Aside: Autoplay Policy
Browsers generally require some interaction from the user before playing sound. This "Autoplay Policy" differs between browsers, but generally means we need to check for permission before we can use the Web Audio API.
To detect if we're allowed to play, we can check the state of the
AudioContext:
If the state is running, it means we're allowed to play without any further
interaction from the user. If it's suspended, we need to do a bit more work to
prompt the user to interact with the page, usually in the form of clicking a
"play" button:
For development, it can be useful to always allow autoplay on specific domains
(e.g. localhost). This can be configured in your browser settings (search for
"sound" or "autoplay").
Conclusion
As we've seen in this chapter, the Web Audio API (and audio programming in general) introduces some concepts that may be new to web developers, namely the audio graph and a different timing model. We've also seen that the Web Audio API provides only basic primitives for working with audio.
With this in mind, the next section of the book dives deep into building abstractions on top of the Web Audio API to express the building blocks of music.
Further Reading
- JavaScript – Mozilla Developer Network
- Eloquent Javascript – Marijn Haverbeke
- JavaScript: The Definitive Guide – David Flanagan
- You Don't Know JS – Kyle Simpson
- JavaScript Allongé – Reg Braithwaite
- What Is the Web Audio API? – Tero Parviainen
- JavaScript Systems Music – Tero Parviainen
- Making Generative Music in the Browser – Alex Bainter